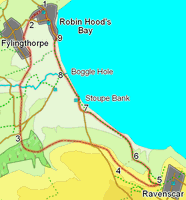
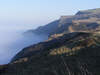
 This is one of my favourite low level walks in the North York Moors. The old coastal railway south of Robin Hood's Bay is an ideal walking route, climbing gently up towards Ravenscar and passing through a variety of landscapes, starting in the sheltered fields around Flyingthorpe, then running through a long but narrow strip of woodland, before emerging back into more a more rugged moorland farming environment as it climbs around Brow Moor, while offering superb view back along the coast to Robin Hood's Bay. We then return to the village along the cliff tops, with at least one short spell walking along the beach, before finishing in the village of Robin Hood's Bay, one of the prettiest of all the moorland villages.
Ascent: 600ft/ 180m
Length: 8 miles/ 12.5km
Map: Explorer 027 North York Moors East
Last Walked: 10 February 2008
Go to printable version
There are two car parks in Robin Hood's Bay. We start from the larger of the two, on the site of the old railway station and signposted as the main car park. Not only are we much more likely to find a place in this car park, it is also the starting point for our walk.
 We start at the larger of the two car parks in Robin Hood's Bay. This was originally the station, and some of the railway buildings still survive at the western end of the car park. Our walk begins to the left of these buildings. As we pass these buildings, the western end of the park turns into a road. We follow this road as it drops down and curves gently to the left. The OS map shows a permissive footpath leaving to the right and running through the buildings beside the road, but this route not longer exists.
 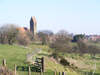 After a short distances this small side road reaches the main road that runs west from Robin Hood's Bay towards Fylingthorpe. Cross this road, turn right and follow it as it climbs up towards a right hand bend. Just before this bend we reach a gate to the left, which leads us on to the route of the railway. Turn left through this gate, and follow this route south through the fields. We now follow the line of the railway for a mile and a half without any disruptions. The first part of the railway is now a tarmaced road serving one of the farms, but after a short distance the tarmac ends and we return to the original railway track bed.
 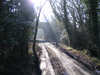 There is only one break in the line of the railway between Robin Hood's Bay and Ravenscar. After just over a mile and a half, there is a junction in the path. Take the right hand (better quality) branch. After a few feet this branch reaches the site of a small station, running between the remains of the platforms. Just beyond the station we reach the only point where one of the railway bridges has been demolished. Here we take the flight of steps that leads down to a small road, cross that road and then climb back up another flight of steps that leads back onto the railway. Our walk along the railway will now be uninterrupted for another two and a half miles as it climbs up and around the flanks of Brow Moor.
 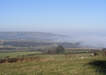 Just over two miles after this brief interruption a well signposted permissive footpath leaves the railway to the left, running down the hillside towards the Cleveland Way. If time is short it is possible to take this permissive path - this cuts one mile off the walk, and takes us to step six (below). However, this shortcut also misses out the old alum quarry at Ravenscar, which is well worth the extra distance.
 We now need to transfer from the route of the railway on to the Cleveland Way. In normal circumstances this is a simple process. We follow the line of the railway all the way through the old industrial works, as it curves around to the left and climbs up towards Ravenscar. Just before the final climb into the village, our route along the railway is blocked where the the railway enters a cutting that originally led to a short tunnel that took it under the road at Ravenscar. The path turns to the left, and joins another track at a T-junction. The Cleveland Way runs along this track. Turn sharply left, and follow this track as it run back to the west, initially running alongside the railway. After a short distance turn right and follow the Cleveland Way along the track as it drops down the hillside, heading towards the sea.
At the time of writing (February 2008) this route is blocked by a landslide so we have to follow a diversion. We follow the railway through the quarry workings until we reach a point where it is blocked by a temporary barrier. An alternative route into Ravenscar is signposted, and this route will take us to the Cleveland Way.
 The diversion begins by turning right onto a short path that climbs down the side of the railway embankment. This almost immediately joins up with another path. Turn right onto this path and follow it as it curves around to the right and crosses under the railway. Just to the north of the railway, we reach yet another path. Turn right and follow this path as it runs east alongside the line of the railway. We have now turned around 360 degrees and are heading in the same direction as on the railway. After just over 600 feet on this path, we join the Cleveland Way at a T-junction with a track, where we turn left and follow the Cleveland Way along the track as it drops down the hillside, heading towards the sea.
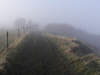
 We follow this track as it runs north through the old quarry. At the edge of the quarry, this track joins another track at a T-junction. Turn left onto this new track, following the Cleveland Way signs. We follow this track as it runs across the hillside, passing the old Alum works (to the right). Just beyond the northern end of the permissive footpath we passed earlier, the Cleveland Way turns right, leaving the track to follow a path that runs along a field edge towards the cliff tops. Follow this path, and then turn left and follow it as it runs along the cliff top.
  This section of the path runs along the cliff top for just under a mile, before it reaches a minor road. Turn right onto this road and follow it towards Stoupe Bank Farm. At the end of the road there is a small car park, and a path that leads steeply down towards the sea shore.
When we reach the shore we had two choices of routes. The Cleveland Way crosses a bridge over Stoupe Beck and then climbs back up onto the cliff top. However, even at high tide it should be possible to walk along the beach for the next section of this walk, with the cliffs to the left.
 The next break in the cliffs is only a third of a mile past Stoupe Beck, at Boggle Hole. Once again it is possible to take either the cliff top or sea side routes, depending on the tides - at high tide the beach route between Boggle Hole and Robin Hood's Bay is under water.
To return to the Cleveland Way on the cliff tops at Boggle Hole, turn left and climb up the road that runs to the left of Mill Beck. After a very short distance a footpath leaves this road to the right, running directly towards the Youth Hostel and a bridge that crosses the beck. Cross this bridge and then follow the Cleveland Way as it climbs steeply up the opposite side of the valley, eventually reaching the cliff top.
 This final section of the cliff top path falls into three sections. First it runs through a patch of high, dense bushes close to the cliff top. Soon after emerging from these bushes, the path runs between two fields, before reaching a T-junction with a track. Turn right onto this track, and then left onto the final section of the path. This section runs along the top of the cliffs, before reaching the edge of some woods south of Robin Hood's Bay. Here the path turns to the right, and descends down a flight of steps towards the village. Just before we reach the village, there is a junction in this path. The left hand branch leads directly to the fish and chip shop in the village, while the right hand branch runs down to the beach.
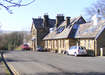
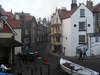 Whichever route we chose to take, we are now in Baytown, the scenic lower part of Robin Hood's Bay. Take the time to explore the maze of alleyways that make up the village, before eventually climbing back up to the upper village. To return to our starting point, climb up the steep road that leads out of the lower village. At the top of the climb carry on along this road, following it north back to the railway car park.